|
GPS Setup |
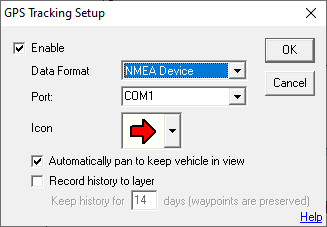
The GPS Setup screen, located on the Setup Menu, allows users to configure Think GIS to show the units location on the map via a GPS receiver connected to the laptop:

Enable
Check this box to instruct Think GIS to communicate with the GPS device and show its location on the map. Once checked Think GIS will automatically start communicating with the GPS each time Think GIS is started.
Data Format
See Data Format options
Port
See Communication Port options
Icon
Select the icon to use to represent the current location on the map. The icon represents both position and direction of travel.
Auto Pan
See Auto Pan options
Record History To Layer
When this option is checked Think GIS will record all travels to a layer called _Gps_Track_Log_. This feature works in both editors and viewers. Data is recorded once every 5 sec and only while moving. The live Think GIS display continues to update once a second as normal. Each time stamped record is recorded as its own feature and drawn as a line segment. The file is automatically saved every 15 minutes and silently saved when the map is closed. The GPS status light at the bottom of the map will turn red if the history recording ever fails for any reason. The layer could be turned on if desired, but is probably more practical to leave turned off. The layer is in the index and will allow users to query previous travel locations, such as a range of time stamps to highlight a "portion" of the track log on the map. An option is included to automatically delete old records to maintain the log at a reasonable size. Set this value to 0 to keep the history forever. Think GIS only performs a purge of the log layer every few days, so it is best to interpret this setting as "keep AT LEAST this many days of history". Any waypoints recorded to this same layer are not affected by this purging of old track data.
How to setup a 9pin NMEA compliant GPS device to a laptop's RS232 port
Use these instructions if the GPS receiver has a 9 pin RS232 serial port connector and the laptop also has an RS232 port. Most newer laptops do not have RS232 ports.
1) Connect the GPS receiver to the serial port of the laptop computer.
2) Be sure that the GPS receiver is set up to output in "NMEA" format.
3) From the Think GIS menu select Setup - GPS Setup.
4) Check the "Enable" check box.
5) Select "NMEA device" as the format.
5) Specify the Computer Port where the GPS is connected to the receiver (most likely COM1).
6) Click the OK Button and a white dot or arrow will appear on the screen and update its location about every second.
7) Click the "GPS" status light at the bottom of the Think GIS display for diagnostic information.
How to setup a 9pin NMEA compliant GPS device to a laptop's USB port
If the GPS receiver has a 9 pin RS232 connector, but the computer does not, then an RS232 to USB adapter will be needed. The adapter software will create a virtual RS232 port on the laptop. The instructions directly above will allow users to connect to this virtual port using this adapter.
How to setup a Garmin USB GPS Receiver
Think GIS can communicate natively with a Garmin USB device without the need for any converters or software drivers.
1) Connect the Garmin GPS device directly to the computer's USB port.
2) In Think GIS select Setup - GPS Setup.
3) Check the "Enable" check box.
4) Select "USB Device" as the format.
5) Click the OK Button.
6) Click the "GPS" status light at the bottom of the Think GIS display for diagnostic information.
How to setup a non-Garmin USB GPS Receiver
Most USB GPS devices come with a software driver for emulating NMEA communication. Refer to the instructions that came with the GPS receiver. Typically a software driver will create a virtual COM port on the computer. Use device manager to learn the identify of the new port (ie. "COM8") and then use the instructions at the top of the page to connect to this port.
Related Topics:
Import pre-recorded data from a GPS receiver to the map
Export map points to a GPS receiver
Track a fleet of vehicles (AVL)
|
Copyright © 2025 WTH Technology |