|
Move Vertex |
The move tool can move vertexes by simply dragging and dropping them.
To move a single vertex
1) Click the ![]() button on the Editing Toolbar (or Ctrl-Shift-H).
button on the Editing Toolbar (or Ctrl-Shift-H).
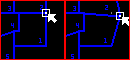
2) Move the pointer to a line end point or other vertex
3) When the small snap box appears, indicating that the mouse is positioned over a vertex, press and hold down the left mouse button.
4) While holding down the button move the pointer to the new location for this vertex.
5) Release the left mouse button.
6) Any entities that share this vertex point will be modified.
7) Repeat this process from step 2 to move other vertexes or click the right mouse button (or Esc key) to finish out.
Notes:
•It is not necessary to specify a Current Feature or Current Layer before using this tool. The tool works on any layers that are, visible, locked, and selectable.
•See also the Conform Tool for stretching a string of vertexes to match another.
•For more information on configuring snaps see snaps.
•For other similar techniques on using the Move tool see Moving Entities.
•Users can use any of the magnifying glass buttons to zoom in, zoom out, and pan while in the process of moving.
•Tool use instructions will also appear in the footer of the Think GIS window in the Instructional Bar.
|
Copyright © 2026 WTH Technology |