|
Move Entity |
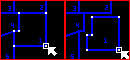
The move tool can move whole entities by selecting the entity rather than the vertexes.
To move an entity
1) Click the ![]() button on the Editing Toolbar (or Ctrl-Shift-H).
button on the Editing Toolbar (or Ctrl-Shift-H).
2) Position the pointer over a line segment or other entity (not at a vertex) and press and release the left mouse button. To select an area entity click just inside the border of the area.
3) Repeat step 2 to select additional entities or click the right mouse button (or Esc key) to proceed to the next step.
4) Using the "move from" pointer left click on a reference point on or near the selection.
5) Using the "move to" pointer left click on the new location for this reference point.
6) All vertexes of the selected entities will then be moved in the direction and distance indicated by the from-to points.
7) Continue to move the current selection further by selecting another set of from and to points or click the right mouse button (or Esc key) to finish moving the selection.
Notes:
•It is not necessary to specify a Current Feature or Current Layer before using this tool. The tool works on any layers that are, visible, locked, and selectable.
•Unlike the move selection technique, this selection method only moves the entities selected, even if they share a common vertex point with another entity.
•If multiple Entities are drawn on the map very near to the selected point, then Think GIS will display a pick list to select from.
•In place of steps 4 and 5 above, users can also simply drag and drop any selected vertex using the "move from" pointer and all other selected vertexes will move by the same amount.
•For other similar techniques on using the Move tool see Moving Entities.
•Use any of the magnifying glass buttons to zoom in, zoom out, and pan while in the process of moving.
•Tool use instructions will also appear in the footer of the Think GIS window in the Instructional Bar.
|
Copyright © 2026 WTH Technology |