|
Place Label Button |
WTH strongly advises using the Auto Label feature in Layer Settings, instead of placing label entities on the map.
Use the label button to place feature text on the map.
To label a feature on the map
1) Specify a Current Layer and Current Feature on the edit tool bar. This should be the feature to be labeled. If necessary first use the New Ftr button to create the feature.
2) Click the ![]() button on the Editing Toolbar (or Ctrl-Shift-O).
button on the Editing Toolbar (or Ctrl-Shift-O).
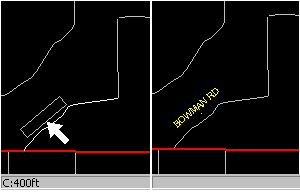
3) A rectangle will appear on the screen representing the outline of the text.
4) Use the PgUp/PgDn keys to adjust the size of the box. Use the arrow keys to rotate it. Use the C, R, or L keys to set justification. Note that the justification and text height are displayed in the lower left of the screen.
5) Using the mouse, move the text box to the location to place the label.
6) Click the left mouse button to place the label on the map. The text used for the label comes from the feature record as determined by the "short label" format found in Layer Format.
7) Click the right mouse button (or Esc key) to finish out of label mode or continue to place additional labels representing this same feature.
Quick Reference:
Left Click Place label
Right Click Finished
Middle Click Update current feature (select feature to label).
Dbl Middle Click Update current feature + set alignment
Up Rotate text +1 deg
Down Rotate text -1 deg
Left Rotate text +22.5 deg
Right Rotate text -22.5 deg
PgUp Increase text height
PgDn Decrease text height
A Aligns text angle to match nearest line
C Center justify text
R Right justify text
L Left justify text
S Highlight vertexes
Ctrl-S Highlight vertexes and keep them on
Scroll Wheel same as PgUp / PgDn
Labeling existing geometry:
If a polyline or other entity already exist on the map representing the feature to be labeled, select it on the map rather than having to select it from a list. To do this go directly to step 2 and then click the middle mouse button on the entity to label. This will automatically set the current feature before continuing. After placing the label in step 6, continue to middle click on other entities to label them also.
Double-clicking the middle mouse button on a polyline entity will set the current feature and automatically align the text with the polyline.
Automatic labeling:
Think GIS also has an auto labeling feature that automatically places feature labels next to entities on the map. Autolabels save the time of placing labels manually but the placement of the labels can be random and will typically not appear as clean as labels placed using the label button. For more information see Autolabels.
Modifying labels after they have been placed:
Use the Move Entity Button to adjust the height, angle, or orientation of a label after it has been placed. To change the height, angle, or orientation of several labels at once select Modify all Labels from the Cleanup and Conversion Tools menu.
Notes:
•Tool use instructions will also appear in the footer of the Think GIS window in the Instructional Bar.
|
Copyright © 2026 WTH Technology |