|
Import From DBF File |
Use this command, located on the Tools Menu > Import/Export Menu, to import text from a DBF file. A new Feature will be created on the map for each record in the DBF file. This tool is typically used to setup a new layer followed by the manual process of marking each Feature's location on the map.
To import DBF records:
1) From the main menu select Tools - Import/Export - Import From DBF File - Create New Features
2) Select a DBF file using the file browser.
3) Select an import method:
Add to an existing Layer: Select this option to import the DBF records into a layer that already exists on the map. These new Features will be added to any existing Features. See "Existing Layer" section below for further instructions.
Overwrite an existing Layer: Same as above only the layer will first be erased before importing the DBF records. This option is typically used for re-importing. See "Existing Layer" section below for further instructions.
Create a new Layer: Select this option to create a new Layer for these DBF records. See "New Layer" section below for further instructions.
Existing Layer (continued from step 3 above):
4a) Select a destination layer from the layer list. If the layer is not already locked, users will be prompted to do so.
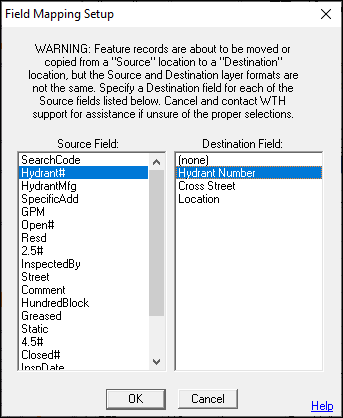
5a) If the record layout of the DBF file does not match that of the existing layer, then Field Mapping will be required.
6a) "Do you want to combine like records into the same Feature?" If Yes, then any new Features whose key fields match those of an existing Feature will be considered redundant and will not be added. If No, then all DBF records imported.
7a) Done! If opening up the map index, there will be a dot in the first column next to each of these new features indicating that they do not have any entities representing them on the map.
New Layer (continued from step 3 above):
4b) Type a descriptive name for this new layer. Layer names can contain any characters including spaces and be up to 30 characters long.
5b) Next, users will be presented with a list of all the fields in the DBF file. Place a check mark next to the fields to be imported. Think GIS will create a new layer preformatted with these fields.
6a) Done! Opening up the map index, users will see a dot in the first column next to each of these new features indicating that they do not have any entities representing them on the map.
Notes:
•See also Layer Format screen for setting up a live link between a Think GIS layer and a database.
•If Field Mapping is required and a TMGUID field is present in the Source but not the Destination layer, it is recommended that the action is canceled and a GUID field is first added to the Destination layer.
|
Copyright © 2026 WTH Technology |