|
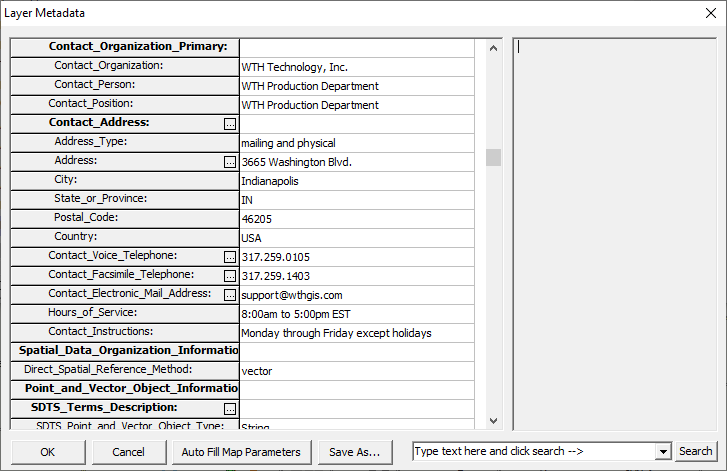
Layer Metadata |
Summary:
Think GIS has a mechanism for assisting in writing and storing metadata. Meta-Data is a term that means information about data. As it pertains to Think GIS, metadata means information about a layer file. To create or access metadata for a layer, go to the layer settings window, click in the Metadata column for the desired layer, then click "Setup Metadata for this layer". A metadata screen displays the metadata in a table where users can edit it and includes several tools to automate the data entry including pick lists, heads up help, searching, and automatic back filling of some fields from the layer data itself. The metadata gets stored inside the layer file and can be exported to a text file. Since different metadata standards exists for what types of information should be recorded, Think GIS uses a modifiable template file to specify what fields should be recorded for each layer including any default values.
Auto Fill Map Parameters:
Click this button to automatically populate some of the technical fields with information that Think GIS already knows about the layer. This includes map projection and other similar parameters.
Duplicating fields:
Fields that allow multiple entries have an button on their row. Click this button to add an identical field or set of fields.
Save As:
Click the "Save As" button to export the metadata out to a text file.
Searching:
To locate a specific field name or field value in the long list of metadata type a word or phrase in the search box and click search.
More About Template Files:
Think GIS ships with a full-blown federal metadata standard template (federalMetaData.mdt). Many local agencies, however, adopt abbreviated standards which can be implemented by modifying this template. One example of this is "indianaGISMetadata.mdt" which is based on the Indiana GIS Council recommended standard. Attempting to view the metadata for a layer that has not yet been assigned any metadata will prompt the user to select one of the templates found in the Think GIS directory (*.mdt).
Storage in ALS:
The raw metadata is actually stored in the layer's Advanced Layer Settings (ALS) under a section called [Metadata]. This format is cryptic, but it may occasionally be required that users go here and modify the layout of the data. This is also the best place to simply delete all metadata stored with the layer so that next time the metadata window is opened, a blank form will appear based on the template selected.
Metadata Text file:
When TM exports the metadata to a text file it automatically removes any unused tags and formats the data in a more presentable fashion.
Customizing Metadata Templates (Advanced):
MDT files can be opened and edited with any text editor. This file is loaded into a layer whenever metadata is first created for that layer. The format of a template file is fairly cryptic and it is very important to adhere to all the rules described below. These formatting rules refer to the example shown here .
Example (note: line numbers at beginning of each line are just used here for reference):
1 %DatePublished%=Date published or released. Use format '20041231'
2 %Title%=Format~~ keyword_steward_extent_date~~ Keyword Example - Bridges
3 %LayerOwner%=WTH Technology, Inc. or the entity that contracted with WTH
4 Metadata:
5 Identification_Information:
6 Citation:
7 Citation_Information:
8 Originator<typ=text cnt=1-n dom=Unknown|...>:WTH Technology, Inc.
9 Publication_Date<cnt=1-1 typ=date>:%DatePublished%
10 Title<typ=text cnt=1-1>:%Title%
11 Geospatial_Data_Form<typ=text cnt=0-1 dom=map|vector data>:vector data
12 Other_Citation_Details<cnt=0-1 typ=mtext>:line 1~~line 2~~line 3
13 remainder of metadata not shown here
General Organization
The template file has two major divisions; the variables and the body. The variables (lines 1-3 above) must always be declared at the beginning of the file. See 'Variables' section below for a description of what these lines do. The remainder of the template file lists the metadata tags in the exact order that they will be displayed. See 'Metadata tags' section below for general organization of these lines.
Variables
Variables are used to help populate redundant information used throughout the template. In the above example, a publication date is used in several places throughout the metadata. So to save the user from having to type the date in several locations a variable is used so that they will be prompted once to enter a date and the value will be automatically inserted everywhere it is needed throughout the document. Users must declare any variables used at the beginning of the template (see lines 1-3 in example). Users can declare as many variables as desired. The format of each variable line is %VARIABLENAME%=INSTRUCTIONS. Note that the variable name must always have a '%' at the beginning and end. The instructions are what is displayed to the user when he is prompted to enter the value for this variable. The instructions must follow the 'One line per tag' rule described below. Also, avoid using a colon ':' in the instructions for reverse compatibility with older versions of Think GIS. Once the variable is declared, users can then use the variable in any tag values throughout the document (see example lines 9 and 10).
Metadata tags (Lines 4-12 in example)
The format of each metadata tag line is as follows:
Indenting spaces, Tag name, <Tag settings>, :, Default value
The indenting spaces are used to control the hierarchy of the tags. Always use exactly two additional spaces to indent a tag. For example, line 5 above starts two spaces indicating that the 'Identification_Information' tag is a subset of the 'Metadata' tag. And line 6 has four spaces to indicate that the 'Citation' tag is a subset of the 'Identification_Information' tag.
The Tag name can contain any letters or numbers but no other symbols.
The optional Tag settings define things such as type of user input and pick lists. Tag settings must be enclosed in <> brackets. The settings with the brackets can be any combination of the following:
•o typ=text This indicates that the user can enter a single line of text for this tag value. If no typ is included (as in line 6), then this tag will be assumed to be a category and no user input will be allowed.
•o typ=mtext This indicates that the user can enter multiple lines of text for this tag value.
•o typ=date This current functions identically to typ=text but future version of Think GIS may check values of this type to make sure they conform to date format.
•o cnt=0,1 This indicates that this tag, or category of tags, can be used as few as zero times but no more than once. Or in other words its optional.
•o cnt=1,1 This indicates that this tag can be used as few as once but no more than once. Or in other words it is mandatory. Currently Think GIS does not do any checks to see if all mandatory tags are filled in but it may do this in the future.
•o cnt=0,n The n here indicates that this tag, or category of tags, can be duplicated as many times as it is needed.
•o dom=value1|value2|value3|… This indicates that a pick list should be displayed listing the respective values. The optional ellipses at the end of the pick list indicates that the user can manually enter anything in this value they want (ie. Not limited to what's in list). The dom setting must be the last setting used within the <> brackets.
The colon ':' marks the end of the tag definition and the beginning of an optional default value.
The default value can contain just about any text including variables. Be sure to adhere to the 'One line per tag' rule described below.
One line per tag
It is absolutely critical to use only one line per variable or per tag. In other words, don't continue any long variable instructions or tag line onto another line or Think GIS will consider it to be a new tag. Turn "Word Wrap" off in the text editor to help assure that this rule is not violated. If the instructions or metadata tag value require multiple paragraphs then insert a double tilde "~~" anywhere a paragraph break is to be displayed. For example, line 2 above will display instructions that look like this:
Format
keyword_steward_extent_date
Keyword Example - Bridges
|
Copyright © 2026 WTH Technology |